你好,其实你只需要在示例代码上换一个模型、改一些参数就行就可以,YOLOv8和YOLO11的模型输出是一样的,后处理步骤也是一样的。
参考如下代码:
from libs.PipeLine import PipeLine
from libs.AIBase import AIBase
from libs.AI2D import Ai2d
from libs.Utils import *
import os,sys,ujson,gc,math, urandom
from media.display import *
from media.media import *
from media.uvc import *
import nncase_runtime as nn
import ulab.numpy as np
import image
import aidemo
from nonai2d import CSC
# Custom YOLO11 object detection class
class ObjectDetectionApp(AIBase):
def __init__(self, kmodel_path, labels, model_input_size, max_boxes_num, confidence_threshold=0.5, nms_threshold=0.2, rgb888p_size=[224,224], display_size=[1920,1080], debug_mode=0):
"""
Initialize object detection system.
Parameters:
- kmodel_path: Path to YOLO11 KModel.
- labels: List of class labels.
- model_input_size: Model input size.
- max_boxes_num: Max detection results to keep.
- confidence_threshold: Detection score threshold.
- nms_threshold: Non-max suppression threshold.
- rgb888p_size: Camera input size (aligned to 16-width).
- display_size: Output display size.
- debug_mode: Enable debug timing logs.
"""
super().__init__(kmodel_path, model_input_size, rgb888p_size, debug_mode)
self.kmodel_path = kmodel_path
self.labels = labels
self.model_input_size = model_input_size
self.confidence_threshold = confidence_threshold
self.nms_threshold = nms_threshold
self.max_boxes_num = max_boxes_num
# Align width to multiple of 16 for hardware compatibility
self.rgb888p_size = [ALIGN_UP(rgb888p_size[0], 16), rgb888p_size[1]]
self.display_size = [ALIGN_UP(display_size[0], 16), display_size[1]]
self.debug_mode = debug_mode
# Predefined colors for each class
self.color_four = get_colors(len(self.labels))
# Input scaling factors
self.x_factor = float(self.rgb888p_size[0]) / self.model_input_size[0]
self.y_factor = float(self.rgb888p_size[1]) / self.model_input_size[1]
# Ai2d instance for preprocessing
self.ai2d = Ai2d(debug_mode)
self.ai2d.set_ai2d_dtype(nn.ai2d_format.RGB_packed, nn.ai2d_format.NCHW_FMT, np.uint8, np.uint8)
def config_preprocess(self, input_image_size=None):
"""
Configure pre-processing: padding and resizing using Ai2d.
"""
with ScopedTiming("set preprocess config", self.debug_mode > 0):
ai2d_input_size = input_image_size if input_image_size else self.rgb888p_size
top, bottom, left, right, self.scale = letterbox_pad_param(self.rgb888p_size, self.model_input_size)
self.ai2d.pad([0,0,0,0,top,bottom,left,right], 0, [128,128,128])
self.ai2d.resize(nn.interp_method.tf_bilinear, nn.interp_mode.half_pixel)
self.ai2d.build(
[1, ai2d_input_size[1], ai2d_input_size[0], 3],
[1, 3, self.model_input_size[1], self.model_input_size[0]]
)
def postprocess(self, results):
"""
Apply YOLOv8 post-processing including NMS and thresholding.
"""
with ScopedTiming("postprocess", self.debug_mode > 0):
new_result = results[0][0].transpose()
det_res = aidemo.yolov8_det_postprocess(
new_result.copy(),
[self.rgb888p_size[1], self.rgb888p_size[0]],
[self.model_input_size[1], self.model_input_size[0]],
[self.display_size[1], self.display_size[0]],
len(self.labels),
self.confidence_threshold,
self.nms_threshold,
self.max_boxes_num
)
return det_res
def draw_result(self, img, dets):
"""
Draw detection results and send label info via UART.
"""
with ScopedTiming("display_draw",self.debug_mode >0):
if dets:
for i in range(len(dets[0])):
x, y, w, h = map(lambda x: int(round(x, 0)), dets[0][i])
img.draw_rectangle(x,y, w, h, color=self.color_four[dets[1][i]],thickness=4)
img.draw_string_advanced( x , y-50,32," " + self.labels[dets[1][i]] + " " + str(round(dets[2][i],2)) , color=self.color_four[dets[1][i]])
if __name__ == "__main__":
# Align display width to 16 bytes for hardware requirement
DISPLAY_WIDTH = ALIGN_UP(800, 16)
DISPLAY_HEIGHT = 480
# Create CSC instance for pixel format conversion (e.g., to RGB888)
csc = CSC(0, CSC.PIXEL_FORMAT_RGB_888)
# Initialize LCD display (ST7701) and enable IDE display
Display.init(Display.ST7701, width=DISPLAY_WIDTH, height=DISPLAY_HEIGHT, to_ide=True)
# Initialize media manager to manage frame buffers and UVC stream
MediaManager.init()
# Wait for USB camera to be detected
while True:
plugin, dev = UVC.probe()
if plugin:
print(f"detect USB Camera {dev}")
break
time.sleep_ms(100)
# Select and configure UVC video mode: 640x480 @ 30 FPS, MJPEG format
mode = UVC.video_mode(640, 480, UVC.FORMAT_MJPEG, 30)
succ, mode = UVC.select_video_mode(mode)
print(f"select mode success: {succ}, mode: {mode}")
# Define input image from USB camera (sensor side)
rgb888p_size = [640, 480]
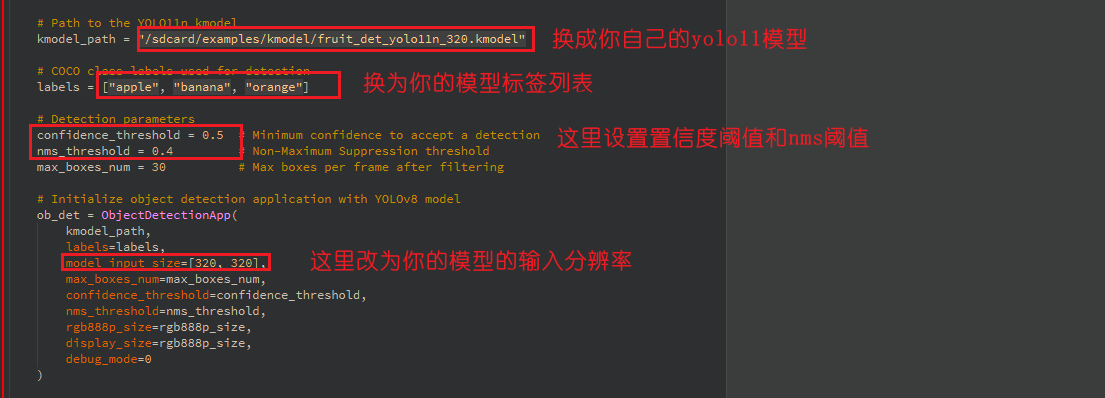
# Path to the YOLO11n kmodel
kmodel_path = "/sdcard/examples/kmodel/fruit_det_yolo11n_320.kmodel"
# COCO class labels used for detection
labels = ["apple", "banana", "orange"]
# Detection parameters
confidence_threshold = 0.5 # Minimum confidence to accept a detection
nms_threshold = 0.4 # Non-Maximum Suppression threshold
max_boxes_num = 30 # Max boxes per frame after filtering
# Initialize object detection application with YOLOv8 model
ob_det = ObjectDetectionApp(
kmodel_path,
labels=labels,
model_input_size=[320, 320],
max_boxes_num=max_boxes_num,
confidence_threshold=confidence_threshold,
nms_threshold=nms_threshold,
rgb888p_size=rgb888p_size,
display_size=rgb888p_size,
debug_mode=0
)
# Configure Ai2d preprocessing (resize + letterbox pad)
ob_det.config_preprocess()
# Start UVC video stream with pixel format conversion enabled
UVC.start(cvt=True)
clock = time.clock()
# Main loop: acquire frame, run inference, draw and display
while True:
clock.tick()
img = UVC.snapshot()
if img is not None:
# Convert format (e.g., to RGB888)
img = csc.convert(img)
# Convert to Ulab.Numpy.ndarray
img_np_hwc = img.to_numpy_ref()
img_np_nhwc=img_np_hwc.reshape((1,3,img_np_hwc.shape[0],img_np_hwc.shape[1]))
# Run YOLOv8 inference on the current frame
res = ob_det.run(img_np_nhwc)
# Draw detection results on the frame
ob_det.draw_result(img, res)
# Show result on display
Display.show_image(img)
# Explicitly release image buffer
img.__del__()
gc.collect()
# Print current frame rate
print(f"fps: {clock.fps()}")
# Clean up: stop display and media system
ob_det.deinit()
Display.deinit()
csc.destroy()
UVC.stop()
time.sleep_ms(100)
MediaManager.deinit()

